
|
sometimes, the users of Dell laptop come across charging issue, users plug in the laptop but it is not charging. This issue “plugged in not charging” can be occurred due to a number of reasons such as your faulty adapter or faulty charging board. If you are facing the same, then no worries, this blog is definitely is written for you. Read this blog, you’ll find a solution to overcome this problem and in case, you need to help then contact Dell support team.
Just follow these given steps and you’ll be able to fix this issue. DIRECTIONS TO FOLLOW:
Related Keywords
Microsoft Window is a computer operating system which changed the history of personal computers since first when it is launched. Windows 10 is its latest operating system known for its Modern UEFI interface, advanced security features like its windows defender with an antivirus program, quick multitasking, and a fast start and shutdown process. Windows 10 has offered the comfort of use and increased the computing performance. Today most of us have already switched from last windows 8.1 to Windows 10 just because of its simplicity and advanced features. Also Dell Support services provide continuous security upgrades to increase the security of your system. Most of laptops and computers are powered with their operating systems. Almost every other personal computer is running on Windows 10. 
If you are living in perth you can visit Dell service centre Perth for instant help or dial our helpline number 1-800-921-785 Related Keywords
When we talk about computers and laptops Dell is a highly reputed brand known mainly because of their top-class quality products and for Dell technical support. And if you are a blogger, you surely spend most of your time writing blog posts and tutorials. While writing instruction you’ll certainly notice that it’s hard to understand everything just by using text. Taking a screenshot is a solution to this problem. There are many ways and various tools available to do so. Taking a screenshot on your Dell machine will help you greatly in creating tutorials, PDF eBooks, etc. Just to help you below are some of these ways to capture screen of your Dell while browsing the internet or simply while making changes on your PC. Below mentioned are the steps to take a screenshot on your Dell laptop/computer:
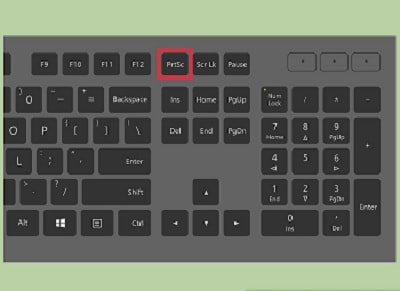
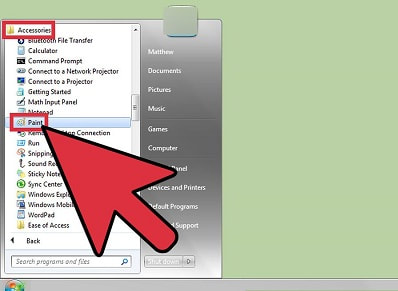
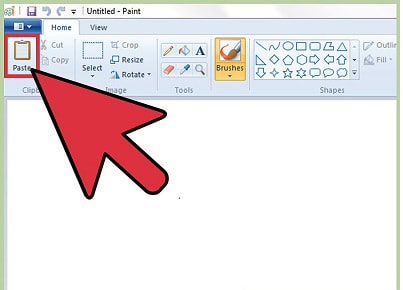
This is very simple and fast way of capturing screen on your desktop. Now let’s learn How to capture a screen on a laptop over the internet via Browser Add-On: Depending on your browser, you use to browse internet there are several free add-ons you can use to capture the screen. Awesome Screenshot is one of them, available on Google Chrome store. Install the plug-in and take a screenshot by just a click of a button. Awesome Screenshot is more than just a screen capturing tool; you can do a lot more by using this like cropping a captured screen well and add annotations. This add-on will make it easy to take and edit a screenshot. There are several other methods listed on Dell support site that you can use to capture an image of you Dell screen. Following are steps if you are facing any problem in your laptops you can take help from Dell support phone number 1-800-921-785 If you are living in Melbourne you can directly visit Dell repair centre Melbourne Related Keywords
If the customers have plugged into the USB drive or SD card and find that the files are missing and replaced with shortcuts. This means that the USB drive has been infected with a virus. The data that the users are searching for is still there but it has been hidden. The user can recover the data and remove the infection from the drive with a few commands and some free tools. He or she has to follow few steps to fix the USB drive: 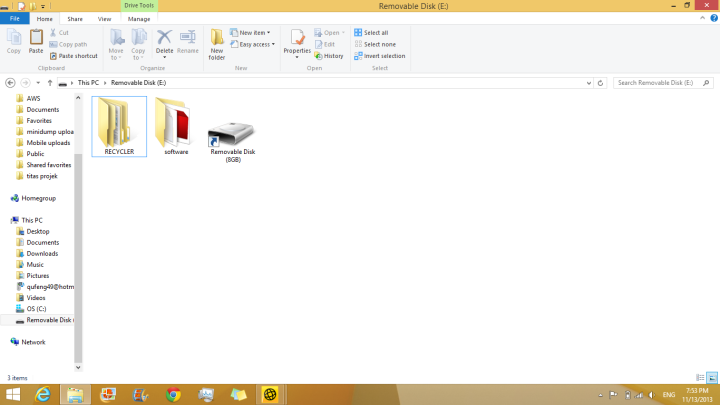
The user has to find the drive letter for the USB drive because the USB drive has been affected by some kind of virus. The easiest and the fastest way to find this is to open the “computer”/ “This PC” window. The drive letter of the USB drive shall be there next to the drive label.
OPEN THE COMMAND PROMPT One customer can fix the problems using a few quick command prompt commands. At times the process of opening the command will vary depending on the version of the windows.
Next the user needs to type attrib –h –r –s /s /d X: \ * . * and press Enter. Then replace x with the USB drive’s letter. For example, if the USB drive letter is E, then type Attrib –h –r –s /s /d E: \ * . * and then press enter Once these steps are followed it will open the files from a hidden position and remove read only attributes and remove the shortcuts. The process can take a while depending on the data on the USB drive. Open the unnamed folder created on the USB drive—this folder has all the hidden files that have been affected by the Virus. Then copy the recovered data to a safe location on the computer. This is infact a temporary location while one finishes clearing the drive. Users can therefore create a folder on the desktop to create a file. The user needs to drag the files from the USB drives to any folder one wants to choose. Right click on your drive in “Computer”, “This PC” and select “Format”. This will open the format window. The formatting process will completely erase the drive so one needs to make sure that they have copied all data. Uncheck the “quick format” and click “start”. This will scan and remove infection on the USB drive. These are the steps to remove the shortcut for virus on windows. If still the customers are having problems then they can call the on Toll-free Dell support Australia 1-800-921-785 and get fixed your problem online. If you’re live in Adelaide you can visit our Dell repairs Adelaide regarding this issue. Related Keywords:
Dell is one of the reputed brands in the market and this brand has successfully delivered many peripherals in the market. Its users are quite happy with the launched products as these products are quite reliable. If you are looking to use Bluetooth on your device but you don’t know how to use. No worries, you can use these given steps in order to make use of Bluetooth feature on your device. It is quite easy to resolve this issue on Inspiron by using these given steps or you can take help from Dell support team. 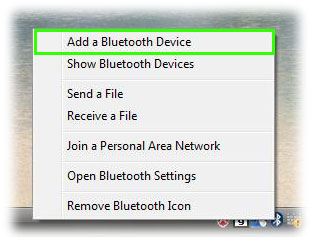 Steps to follow:
Note: When it gives you an option to activate your Bluetooth, you don’t need to cancel it.
1-800-921-785 For perth users go to Dell laptop repairs Perth Related Blog : How to Connect Your Dell Laptop to Wifi? |
